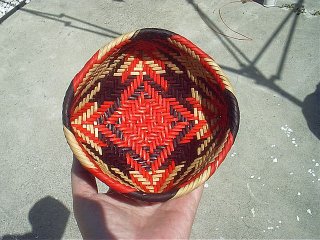
Flowing Water Weaving


Look very carefully at the middle weavers in this basket bottom, bottom photo. This is the way you need to start the basket in order for the design to come out right on the outside bottom.
- The top center weaver begins Under 3 to the left and Over 3 to the right; the bottom center weaver begins Over 3 to the left and Under 3 to the right. This is looking at the middle and when weaving from the middle to the outside edges.
- When turning the rim at the Over 6 row, you will have more of the Over 6 going to the outside than the inside, so the turn isn't exactly in the middle of this row. This will bring the basket side up even with the inside bottom just before beginning the outside bottom.
- I did not tuck the inside weavers to the bottom on this basket and I think it makes for a much fuller and better bottom. Instead I just cut the inside weavers and they will automatically tuck as you weave the outside weavers of the bottom;
- Now looking at the top photo of the basket outside bottom; at the corners you will turn the middle red weaver behind the weaver to it's right; this middle weaver is the 4th red weaver of each red group. The weaver to the right of the one you turn is the corner weaver and forms the corner of your basket.
- I also did not tuck the middle red weaver into the side, but tucked it under the weavers on the side I was weaving. This will prevent this little Over 1 weaver from getting lost in the next Over 2 weaver as you weave around the sides.
- As you weave you will notice that at the fourth wall you'll have a natural weaver that lays over the red weaver, in this bottom photo it is the lower right hand corner first natural weaver next to the last red weaver, this natural weaver is woven from the 4th wall all the way over to the other side - without doing this you will have 4 red weavers rather than three in that grouping;
- Now going up the natural weavers to the upper right hand corner, the first brown weaver in that grouping on the 4th wall will meet a natural weaver, this brown weaver also needs to be woven to the over side and tucked. This will complete a design exactly like Eva's design in the bottom of her Flowing Water baskets.
- For best results in doing this, I cut the weaver which the natural and brown weaver laid over, so that it didn't create bulk. Cut it so that a small portion of it will lay under the overlaid weaver.
This does get complicated, but the only way to learn how to do this is just to weave until it comes out the way you want it.
Comments
http://stores.lulu.com/indianbasketweaving
if you're in Nowata OK, new basket weaving classes are going to start in Oct, send me an email if you're interested...